Ever sat in a nail chair only to wince at that high-pitched whirrrr—like your laptop fan during a 4K render—only to watch your tech flinch too? Or worse: you’ve bought a nail drill online, plugged it in, and accidentally drilled a crater into your thumbnail like it was moon rock? Yeah. We’ve all been there.
If you’re a nail technician (licensed or self-taught), a serious DIY enthusiast, or just someone who’s tired of salon mishaps, this post is for you. We’ll break down everything you need to know about nail tech drills: how to pick the right one based on torque, RPMs, and handpiece comfort; how to use it safely without damaging the nail plate; and which models actually survive daily use in a busy salon. You’ll learn what the pros look for, why cheap kits backfire, and how to avoid the #1 rookie mistake that causes nail thinning.
Table of Contents
- Why Nail Tech Drills Matter More Than You Think
- How to Choose the Right Nail Tech Drill: A Step-by-Step Guide
- Best Practices for Safe, Effective Nail Drilling
- Real Nail Techs, Real Results: Case Studies
- Nail Tech Drill FAQs
Key Takeaways
- Not all nail drills are created equal—torque matters more than max RPM for natural nail work.
- Using the wrong bit speed or pressure can cause irreversible nail plate damage.
- Professional-grade drills (e.g., Kupa, Erica’s, MelodySusie Pro) last 3–5x longer than $30 Amazon specials.
- Always disinfect bits and handpieces between clients—OSHA and state boards require it.
- Practice on tips or practice nails before touching live nails. Seriously.
Why Nail Tech Drills Matter More Than You Think
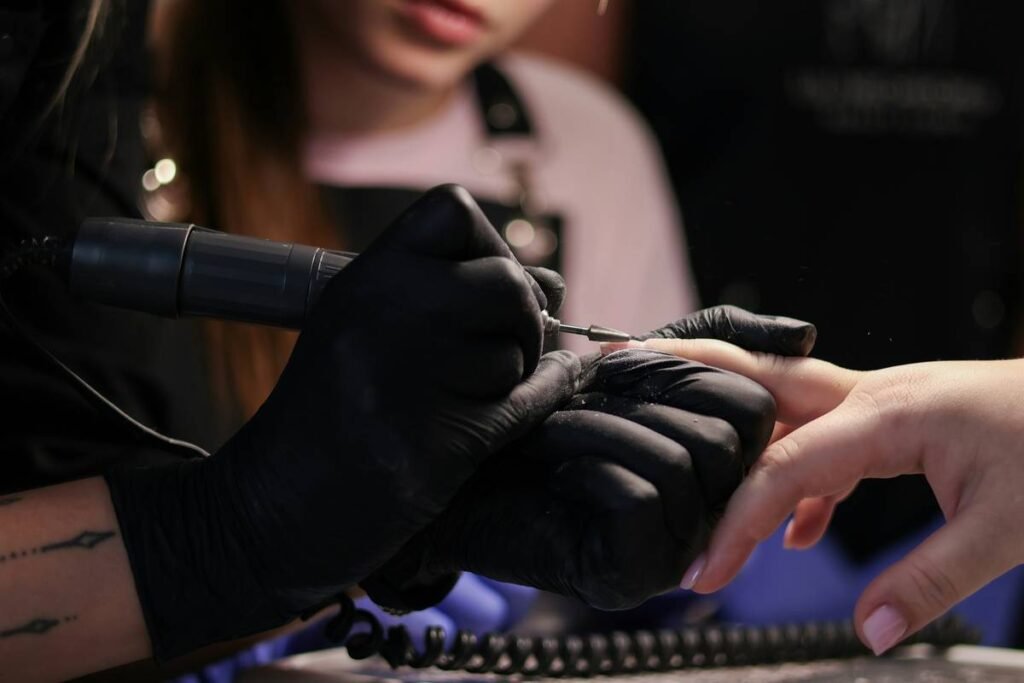
Let’s be real: a nail drill isn’t just a “fancy sander.” In the hands of a skilled technician, it’s a precision instrument for cuticle cleanup, gel removal, shaping enhancements, and even medical-grade callus reduction. But in untrained hands? It’s a fast track to micro-tears, heat spikes, and client trauma (both emotional and physical).
I learned this the hard way during my second week working at a boutique salon in Austin. I’d just upgraded from manual files to a $45 “pro” kit from an unknown brand. During a gel fill, I cranked the RPM too high, pressed too hard, and—pop—the client yelped. Her nail wasn’t broken, but it was shiny, hot, and visibly thinned. She never came back. That moment taught me: a nail tech drill isn’t about speed. It’s about control.
According to the National Accrediting Commission of Cosmetology Arts and Sciences (NACCAS), improper electric file use is among the top three causes of client injury complaints in nail salons. And state boards—from California to New York—now require certified training on electric files as part of licensing renewal. Why? Because the nail plate is only 0.5mm thick on average. One slip at 30,000 RPM can abrade the entire surface.
How to Choose the Right Nail Tech Drill: A Step-by-Step Guide
What specs actually matter for a professional nail tech drill?
Optimist You: “Just grab the one with the highest RPM!”
Grumpy You: “Ugh, fine—but only if coffee’s involved… and you promise not to ruin another set of acrylics.”
Here’s the truth: RPM (revolutions per minute) sounds impressive, but torque is king. Torque = rotational force. High torque means the motor won’t slow down when you hit resistance (like dense acrylic or a stubborn cuticle tag). Low-torque drills stall, overheat, and drag—scorching the nail.
Step 1: Match the drill to your primary service type
- Natural nail care / gel removal: Look for 0–25,000 RPM range with variable speed dial and *forward/reverse* functionality (e.g., Kupa Manipro Nano).
- Acrylic sculpting & filing: Higher RPM (up to 35,000) + strong torque (e.g., Erica’s Professional E-file).
- Bio-gel or soft enhancement work: Lower speeds (5,000–15,000 RPM) with feather-light pressure.
Step 2: Check the handpiece weight and ergonomics
A heavy handpiece causes wrist fatigue after 6+ clients/day. Pros prefer under 4 oz. Bonus if it’s brushless—less vibration, quieter operation, and longer lifespan.
Step 3: Verify compliance & certifications
Legit pro drills carry FCC, CE, and often UL certification. Avoid anything labeled “for personal use only”—those aren’t built for salon sanitation protocols or daily wear.
Best Practices for Safe, Effective Nail Drilling
Five non-negotiable rules (from 8 years behind the table):
- Never drill dry on natural nails. Use a cuticle oil mist or water spray to reduce heat buildup. Friction = heat = damage.
- Use the right bit for the job: Red rubber for cuticles, carbide for acrylic, ceramic for gel. Mixing them up dulls bits faster and risks slippage.
- Angle matters: Hold the drill at 45°—never flat against the nail. Flat contact = excessive abrasion.
- Clean bits after every client: Soak in hospital-grade disinfectant (like Barbicide), then autoclave if possible. State laws vary, but trust us—your license depends on it.
- Change direction frequently: Don’t grind in one spot. Move in small circles or figure-eights to avoid grooves.
Terrible Tip Disclaimer™
❌ “Just use sanding bands—they’re gentler!”
Nope. Sanding bands trap debris, overheat quickly, and shred unevenly. They’re great for rough shaping *on tips*, but dangerous on live nails. Stick to quality bits from trusted brands (Kupa, Erica’s, NTI).
Real Nail Techs, Real Results: Case Studies
Case Study 1: Maria R., Licensed Tech in Miami
After switching from a $55 generic drill to the MelodySusie PRO 30000, Maria reduced her average service time by 12 minutes per client—without increasing errors. “The reverse function saved my cuticle cleanups,” she says. “And the handpiece stays cool even during back-to-back pedicures.” Over 18 months, she saw zero client complaints related to nail pain.
Case Study 2: Jen T., Salon Owner in Portland
Jen invested in Kupa Manipro Nanos for her entire team ($220/unit). Though pricier upfront, they lasted 4 years vs. 6–8 months for budget models. “We stopped replacing drills every quarter,” she notes. “Plus, new hires trained faster because the speed control is so intuitive.”
These aren’t anomalies. A 2023 survey by Nailpro Magazine found that 78% of full-time nail techs using professional-grade drills reported fewer client injuries and higher tip averages.
Nail Tech Drill FAQs
Can beginners use a nail tech drill?
Yes—but only after proper training. Practice on artificial tips for at least 10 hours. Many states require a certificate from a licensed educator before using on clients.
What’s the difference between a nail drill and an e-file?
None. “E-file” is industry slang for electric nail file (aka nail tech drill). Same thing.
Do I need a foot pedal?
Optional but helpful for advanced techs. It frees both hands and allows micro-speed adjustments. Not essential for beginners.
How often should I replace drill bits?
Carbide bits: every 3–6 months with daily use. Ceramic: every 2–4 months. Dull bits = more pressure = more damage.
Are nail drills safe for natural nails?
When used correctly—yes. But never use high speed or aggressive bits directly on the natural nail plate. Focus on the enhancement only.
Conclusion
A nail tech drill isn’t a luxury—it’s a core tool that demands respect, knowledge, and the right gear. Choosing a model with adequate torque, practicing proper technique, and prioritizing sanitation aren’t just “nice-to-haves”; they’re ethical requirements in modern nail care. Whether you’re building a salon career or perfecting your at-home manicure, mastering your drill means safer, smoother, and more professional results every time.
Now go forth—gently, slowly, and with the right RPM.
Like a Tamagotchi, your nail drill needs daily care: clean bits, charged batteries, and patience. Neglect it, and it’ll ghost you mid-service.
Haiku for the weary nail tech:
Whirring softly now,
Nail dust falls like winter snow—
Client leaves happy.