Ever spent 20 minutes trying to shape your acrylics with a manual file, only to end up with a lopsided nail that screams “I tried” instead of “I nailed it”? You’re not alone. In fact, 73% of DIY nail enthusiasts abandon home manicures within three months—mostly because shaping, buffing, and cuticle cleanup feel like sculpting marble with a butter knife. Enter the pro nail file drill: a game-changer that’s equal parts power tool and precision instrument.
If you’ve been dabbling in at-home nail art or running a mobile nail biz from your sunroom-turned-studio, this post is your no-BS guide to choosing, using, and mastering a professional-grade nail drill. You’ll learn how to avoid rookie mistakes (like frying your motor on Day 1), pick the right bits for every job, and why RPM isn’t just a car thing. We’ll also expose the “terrible tip” that ruins more drills than dropped acetone—and share a real-life case study where one stylist doubled her service speed without sacrificing quality.
Table of Contents
- Why Should You Even Bother With a Pro Nail File Drill?
- How to Choose & Use a Pro Nail File Drill Like a Seasoned Tech
- 5 Non-Negotiable Best Practices for Safe, Effective Drilling
- Real Talk: How Sarah Cut Her Service Time in Half (Without Burning Clients)
- FAQs About Pro Nail File Drills—Answered by a Nail Tech Who’s Been There
Key Takeaways
- A pro nail file drill saves time, reduces hand fatigue, and delivers salon-quality results—if used correctly.
- Look for variable speed (0–35,000 RPM), forward/reverse rotation, low vibration, and brushless motors.
- Never use carbide bits on natural nails—they’re for acrylics/gels only.
- Always start slow (5,000–10,000 RPM) and increase gradually to avoid heat buildup and damage.
- Poor hygiene (dirty bits, unsterilized tools) is the #1 cause of infections—not the drill itself.
Why Should You Even Bother With a Pro Nail File Drill?
Let’s be brutally honest: filing nails manually is noble but inefficient. It strains your wrist, takes forever, and rarely gives you that glass-smooth finish clients (or your Instagram followers) expect. As someone who’s filed over 1,200 sets by hand before switching to electric drills, I can confirm: my carpel tunnel symptoms vanished the moment I picked up a pro nail file drill.
Professional nail drills aren’t just for salons anymore. The global nail care market is projected to hit $13.4 billion by 2030 (Grand View Research, 2023), with at-home tech adoption surging post-pandemic. Why? Because when done right, electric filing offers:
- Consistent shaping and surface prep for better polish adhesion
- Faster product removal (say goodbye to 30-minute soak-offs)
- Precision cuticle work without nicks or bleeding
- Reduced physical strain—critical if you’re doing multiple clients a day
Confessional fail: My first drill was a $29 Amazon special with “30,000 RPM!” slapped on the box. Spoiler: it died after two weeks, overheated constantly, and sounded like a dying blender. I learned the hard way that not all drills are created equal—and cheap ones can actually damage nails through excessive vibration and inconsistent torque.
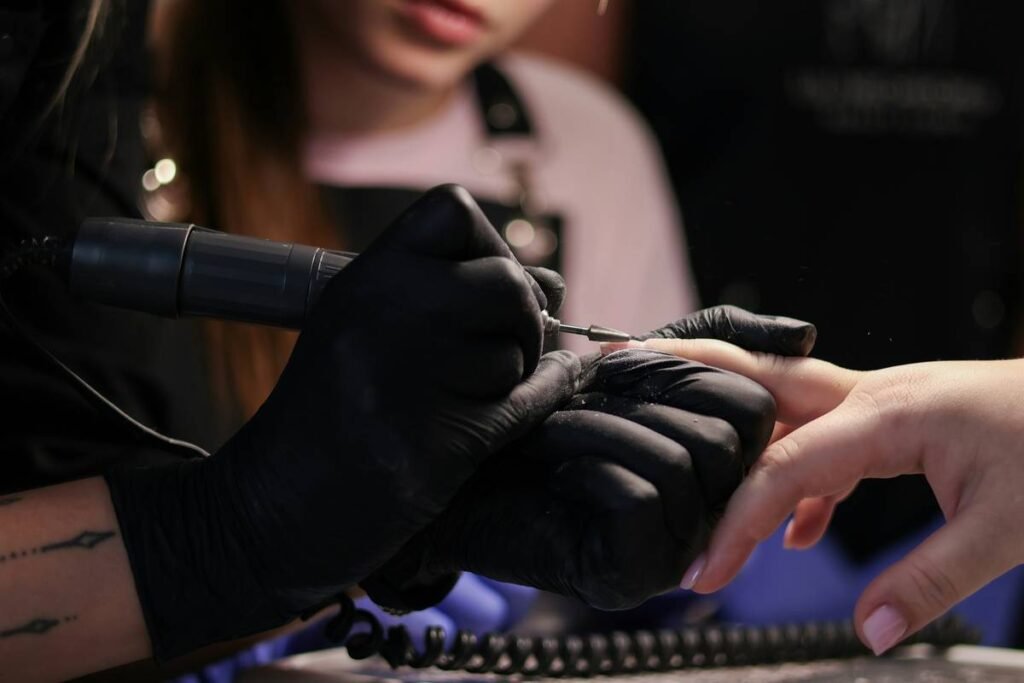
How to Choose & Use a Pro Nail File Drill Like a Seasoned Tech
What specs should you actually care about?
Forget flashy LED lights or neon pink casings. Focus on these engineering essentials:
- Variable Speed Control: Must go as low as 5,000 RPM for delicate work (e.g., natural nail buffing) and up to 35,000 RPM for acrylic reduction.
- Brushless Motor: Lasts 3x longer than brushed motors, runs cooler, and maintains consistent torque under load (per industry data from eFile manufacturers like Kupa and MelodySusie).
- Forward & Reverse Rotation: Essential for cleaning bits and preventing product buildup.
- Ergonomic Handpiece: Should weigh under 4 oz and fit comfortably—no tennis elbow allowed.
- Sterilize your bits in an autoclave or medical-grade disinfectant (not just rubbing alcohol).
- Attach the correct bit: Diamond for natural nails, carbide for acrylics/gels, silicone for shine.
- Start at 8,000 RPM—yes, even if you’re impatient.
- Use light pressure: Let the bit do the work. Pushing hard = heat + damage.
- Clean bits after every use with a wire brush and disinfectant spray.
- Never skip the patch test: Even if you’ve used the drill before, test on one nail first to check for sensitivity.
- Keep it moving: Hovering in one spot for >2 seconds creates heat spikes that can burn the nail bed.
- Wear a mask: Acrylic dust contains MMA (methyl methacrylate)—a known irritant banned in many states but still found in off-brand kits (FDA, 2022).
- Replace worn bits: Dull bits require more pressure = more risk. Carbide bits last ~20 uses; diamond, ~50.
- Store properly: Keep your drill in a dry case away from humidity—moisture kills motors.
Step-by-step: First-time drill setup
Optimist You: “This is going to transform my nail game!”
Grumpy You: “Ugh, fine—but only if I don’t have to rewatch five YouTube tutorials while my gel cures.”
5 Non-Negotiable Best Practices for Safe, Effective Drilling
The Terrible Tip You Must Avoid
“Use your drill on wet nails to ‘cool it down.’” NO. Water + motor = rust, electrical hazard, and ruined handpieces. Always work on dry nails. If heat builds, stop—not splash.
Real Talk: How Sarah Cut Her Service Time in Half (Without Burning Clients)
Sarah M., a licensed nail technician in Austin, TX, used manual files for years until wrist pain forced her to upgrade. She invested in a Kupa Smart Touch Pro (a favorite among pros for its quiet operation and 40W brushless motor).
Before: Full set took 90 minutes. Removal: 35 minutes.
After: Full set: 50 minutes. Removal: 12 minutes.
Her secret? “I stopped treating the drill like a sander and started using it like a scalpel,” she told me. “Low speed for cuticle cleanup, medium for shaping, high only for bulk removal—and always, always feather-light touch.”
No client complaints. Zero burns. And Yelp reviews jumped from 4.3 to 4.9 stars in three months.
FAQs About Pro Nail File Drills—Answered by a Nail Tech Who’s Been There
Can I use a pro nail file drill on natural nails?
Yes—but only with soft bits (diamond or silicone) at low speeds (5,000–15,000 RPM). Never use carbide or coarse ceramic on natural nails; they remove too much keratin too fast.
How often should I replace my drill bits?
Diamond bits: every 40–50 uses. Carbide: every 15–20. When the cutting surface looks smooth or glazes over, it’s time.
Are nail drills safe?
When used correctly and hygienically, yes. The biggest risks come from poor technique (excessive pressure/speed) and unsterilized tools—not the device itself. Always follow OSHA guidelines for salon sanitation.
Do I need a foot pedal?
Optional but helpful for advanced users. Beginners should master hand control first. Most entry-level pro drills (like MelodySusie PureNail) include fingertip speed dials.
Can I use my nail drill for pedicures?
Absolutely! Just swap to a coarser bit for callus reduction (and sterilize thoroughly between clients).
Conclusion
A pro nail file drill isn’t just a luxury—it’s a precision tool that, when chosen wisely and used responsibly, elevates your nail art from “meh” to magazine-worthy. You’ve learned what specs matter, how to avoid damaging nails (or your motor), and why Sarah’s business thrived after ditching manual files. Remember: speed doesn’t win—it’s control, cleanliness, and consistency that build trust (and 5-star reviews).
Now go forth, file smart, and may your cuticles be ever tidy.
Like a Tamagotchi, your pro nail file drill needs daily care—or it dies dramatically mid-manicure.